Friday, January 19, 2007

Changing Eye Color

Digg!


Here is an example of what we will be making.


1. Open your image.
a. Make a new layer, titled it Selection and set the opacity to 50%.


b. Select a small, hard round brush.
c. Paint over the eyes on the Selection layer.


Don't worry, I know how it looks right now but we aren't done yet.

2. Coloring.
a. CTRL + Click and hide the Selection layer (CMD + Click on Mac).


b. Image > Adjustments > Color Balance - This part is up to you, make the eyes whatever color you want. I chose purple.


3. File > Save...

Basic Skills


Digg!


Basic Skills

This chapter covers fundamental solutions that we'll call upon throughout the remainder of this book. And as an added bonus, I'll show you how to create a coupon box with dotted borders -- no doubt you've always wanted to make your very own one of these!

Placing a Graphic in your File

Often you'll want to import existing graphics and artwork into your Photoshop document. A problem for Photoshop? Not at all -- in fact, there are several ways you can do this!

External graphics can be placed in Photoshop as raster layers or Smart Objects. First, I'll show you how to place these graphics, then we'll talk about the difference between raster layers and Smart Objects.


Solution

Placing Artwork from a Web Page

Copy the artwork from the web page, then select Edit > Paste or press Ctrl-V (Command-V on a Mac) to paste it into your Photoshop document. Photoshop will create a new layer containing the artwork, or place it into a selected empty layer. The artwork will be on a raster layer.

Placing Artwork from Flattened Image Files

A flattened image file -- such as a GIF, JPEG or PNG -- contains artwork on a single layer. Open the file in Photoshop and use Select > All or press Ctrl-A (Command-A) to create a selection of the entire document. Click on your Photoshop document then select Edit > Paste or press Ctrl-V (Command-V) to paste it. Photoshop will paste the document into a new or selected empty layer as it does when pasting artwork from a web page. The artwork will be on a raster layer.

Placing Layers from a Different Photoshop Document

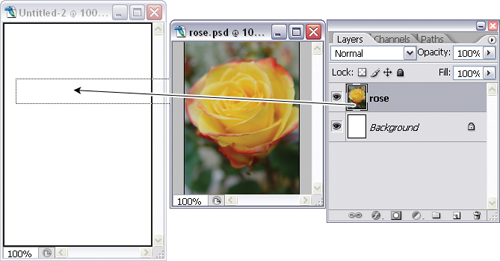
Position the document windows so that both are visible. Select the window of the document you wish to import from, to bring up its Layers palette. Select and drag the necessary layers over to the new window and release the mouse button when you see a thick, black outline around the window. This will copy the layers across as shown in the example at the top of the next page. The copied layers will retain their original properties.
1551_dragdroplayertif
Copying a layer from one Photoshop document to another

Placing Artwork from Illustrator

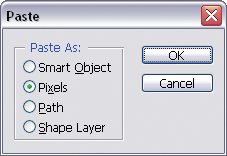
Open Illustrator and select the artwork you wish to export to Photoshop. Copy the artwork using Ctrl-C (Command-C on a Mac). Switch to Photoshop while Illustrator is still open and paste your copied artwork using Ctrl-V (Command-V). A dialog box will appear, asking you whether you wish to paste the artwork as a Smart Object, Pixels, Path or a Shape Layer.
1551_pasteasdialog
Paste dialog box

Placing Artwork as a Smart Object

Select File > Place and choose the file you wish to import. Click Place to import the file into your Photoshop document as a Smart Object. For PDF and Illustrator files, Photoshop will display a dialog box that asks you to select the pages you wish to place. Choose the pages you want and click OK.
1551_boundingbox
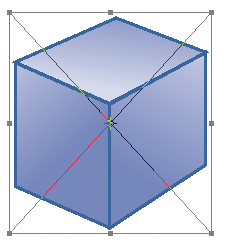
The bounding box for an image pasted as a Smart Object

The Smart Object will initially be placed with a bounding box surrounding it, as shown here. You can use this bounding box to move, rotate, scale, or make other transformations to the object. When you're done, double-click inside the bounding box to commit the Smart Object to its layer.

Discussion

Smart Objects

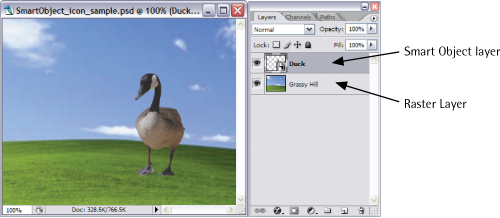
A Smart Object is an embedded file that appears in its own layer in Photoshop. A Smart Object layer is distinguished by an icon that overlays the thumbnail image displayed in the Layers palette, as shown in the example below.

Smart Objects are different from other layers because they are linked to a source file (e.g., an Illustrator file, JPEG, GIF or other Photoshop file). If you make changes to the source file, the Smart Object layer will also be updated with those changes.
1551_smartobjecticonsample
Raster layer vs Smart Object layer

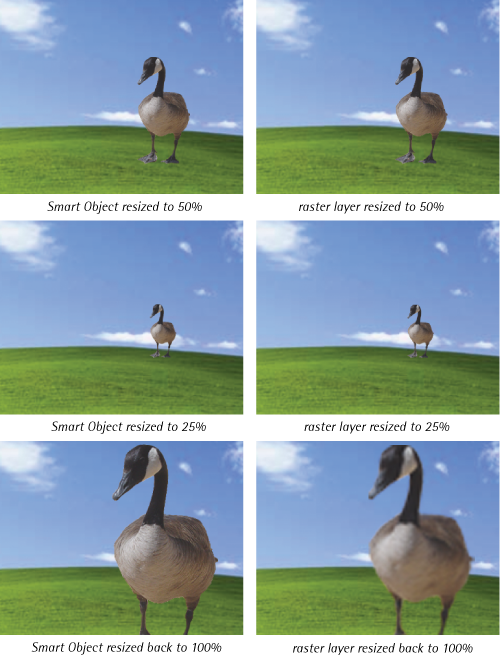
In contrast, raster layers (or regular layers) are fully editable, so you can draw and paint on them, fill them with colors, or erase pixels. Unlike Smart Objects, where you retain image quality, if you resize a raster layer smaller, you will lose information.

This is demonstrated in the example on the next page, which shows the result of a Smart Object that has been decreased in size, then resized back to its original dimensions. The same steps, when applied to a raster layer, produce an image that is blurred and of lower quality.
1551_smartobjectresizing
The difference in image quality when resizing a Smart Object compared to a raster layer

Because Smart Objects are linked to an outside document, you can resize them without losing the original image data. While you can apply layer effects and some transformations to Smart Object layers, you cannot actually manipulate (paint, draw, erase) their pixels because they are not editable from external documents. You can open the original source file for editing by double-clicking on the Smart Object icon.

Rasterizing

You can rasterize Smart Objects by right-clicking on the name of the Smart Object layer and choosing Rasterize Layer. This will break the link to the original source file and treat the layer as an ordinary raster layer.

Color Correction


Digg!


I’m going to start off with something simple. As I do more and more tutorials, they will get more and more complicated. For starters though, I want to be sure that you understand the concepts behind what you are doing rather than just following the steps.

For the first tutorial I’m going to show you how to color correct an image. Sometimes to get good color correction all the way through out an image you have to correct pieces of the image separately from other pieces. Here is the image that we are going to color correct.

image 1

Here is what it’s going to look like when we’re done.

image 2

So, let’s start off by selecting the part of the image that we want to color correct. In this case it’s everything except for the actually screen of the monitor.

Select your Polygonal Lasso Tool.

image 3

This tool will allow you to make a selection on an image in a straight line. Start off in the bottom left corner of the screen on the monitor.

If you need to zoom in you can do so by using the zoom tool.

image 4

With Polygonal Lasso Tool selected, we want to create a selection around the screen of the image like so:

image 5

If you click once in the bottom left corner then move your mouse up to the top left corner, you’ll notice that it creates a straight line for you. Click in the top left corner, then the top right corner and so on until you have the whole area selected. Now you have the screen selected on your monitor. However this isn’t what you want selected.

Now do a Select > Inverse.

image 6

This reverses your selection, so instead of having the screen selected, the rest of the image is selected. This is what we want.

image 7

Now we’re going to go to our Layers Palette. If you’re Layers Palette isn’t open, click Windows > Layers to bring it up. Notice at the bottom of your Layers Palette are some buttons. One of them is your adjustment layers. Your adjustment layers allow you to make modifications to the image as a layer that can be tuned on and off or edited. Therefore you don’t alter your original image. Click the adjustment layers button and click Levels… in the list that pops up.

image 8

In the Levels dialog box you will see a graph like thing. I can’t really explain what exactly this graph thing means, but lets look at it like this… consider it color information. So let’s start color correcting our image. At the top select Red from the Channel pull down. Then lets take the right slider and move it over to the where the graph information starts. You should notice when you do this that your image turns a red tint.

image 9

Now we want to do the same thing for the Green and Blue channels. On the Green channel, we also want to take the middle slider and move it to the left until your middle input level says 0.91. What this does is we are removing some of the green out of the image, because the picture has a slight green tint from florescent lighting.

image 10

Now that the color is set, hit OK.

You should notice an extra layer in the Layers Palette. If you double click on this layer you open up the adjustment layer again and can edit it further if you wish. However for this tutorial, we won’t need to do that.

image 11

Here is what your image should look like so far.

image 12

Now we want to replace the image for the screen. Take an image of your choice to place on the monitor. For this tutorial, I’m going to use a screen grab of my website. Once you open up the image of your choice in Photoshop, select the move tool and drag and drop the image into the image that we are editing.

Now do an Edit > Transform > Distort.

image 13

You’ll notice that the image that you just dropped in has a box around it with little squares in the corner. If you click on one of the little squares and move it around, notice what happens. You can adjust and create different perspectives for your image. Now take each corner of the image and place it in each corner of the display on the monitor.

image 14

Double click inside the screen grab to apply the change. And there you have your final image.

image 2

Download the PSD file.

CHANGING CAR COLOR


Digg!


Step 1:

Choose a high resolution (dpi) car image and convert it to CMYK mode to make it easy for you to adjust the color.

Step 2:
Trace around the area that you wish to change the color using the Pen Tool (path). If you're not use to Pen Tool, use Lasso Tool. Open palette path (F7) and make selection/turn off path [Shortcut: ctrl+click on the path name (PC), command+click (Mac)]


Step 3:
Create a new layer. copy selection from layer "background" and paste.


There are many ways to change the car color such as using curve and color balance but here I use adjustment levels (Image>Adjustments>Levels). In levels, select channel>cyan and adjust the input and output levels by sliding the arrows on the slide bar. Same go with magenta, yellow and black till you get the color that you want.


Finally

Painting Lightning

Here is an example of what we will be making.


Get the photo I used.

1. Make a new doccument or open your image.
a. Make a new layer and title it Lightning.
b. Select the brush tool . Set it to 1 pixel soft. (You may need a larger brush size depending on the size of your image). Set the opacity to 20%.
c. Zoom in. Starting from the top, paint a jumpy line downward. Try not to over due it, you want the lines to be some what straight, but still jagged.

This will be the trunk, or main branch of the lightning. Be sure to have plenty of curves and places to branch out from.

2. Branching out and brightening.
a. Starting from the curves, continue painting downward and outward.

b. Change your brush size to 3 pixels, or slightly larger than the original. Paint over all of the branches.

c. Select your 1 pixel brush again. Paint over all of the branches once more, but this time branch off from all of the branches and continue to paint passed the ends of the original branches. You can reconnect the new smaller branches back to the main branches if you want.

d. Repeat step 2c.

3. Blending mode and atmospheric glow.
a. Open the blending options for the Lightning layer. Set it to Overlay.

b. Duplicate the Lightning layer, title it Lightning 2.
c. Make a new layer and title it Glow. Set the blending mode to Overlay.

d. Select the brush tool again. Set it to 100 pixel soft. (Again, size may change depending on your image size). Keep the opacity at 20%.
e. Paint over the lightning, and above them in the clouds.

4. Reflection.
a. In the image I used, there was a lake. Obviously there would be a reflection of the lightning in the lake. Make a new layer and title it Reflection.
b. Select the brush tool once more. Keep the opacity at 20%.
c. Paint a small area under the lightning, just one stroke. It shouldn't over power the rest.

5. File > Save...

Beginners guide to the paint brush tool in Photoshop. A simple tutorial on how to change brush packs.

This is a simple tutorial on the basics of using and changing brush backs or brush sets in Adobe Photoshop. Aimed at beginners, this tutorial is probably common knowledge to many Photoshop users but I feel so many people are missing out on the true power and potential of the paint brush tool in Photoshop.

I used Photoshop for almost a year and felt quite comfortable with most of the features and felt I had an adequate working knowledge of the program. It was not until I read some online tutorial (which featured a brush pack) that I discovered the real potential behind this brushes in Photoshop. Brushes can be change and manipulated in so many ways as well as featuring the ability to load up preset brush packs (which are readily downloadable on the internet for free in many places.) which are mind blowing in their content compared to the standard supplied brush sets. The tutorial Itself will consist of simple step on how to change your brush packs from their default settings and how to revert back (I thought this would be a good idea since It can be quite confusing if you just want the original brushes back). I will also run through briefly at the end where you put your new brush packs that you acquire and how to make them active in Photoshop so that you can use them. After This you will find a list of resources where you can download and sample new brush packs from the internet and begin uncovering the new power of Photoshop brushes.

Changing Bush Packs In Photoshop

Ok So you want to change your brush pack. Start up Photoshop and open a new blank document.

Step 1: Click on the Paint Brush tool in Photoshop on the toolbar. (see Image A)

Step 2: Click the small downwards pointing arrow next to your brush to open the brush menu allowing you to choose different brushes from that set and change their basic settings (hardness and size). This is also the place where you will access your brush packs from.

Step 3: Click the small arrow which points right just next to the box which lists the size of the brush illustrated on Image B. This opens this list of your current loaded brush packs and from here you can select which pack you want to load.

Step 4: Simple click the pack the you want to load up I chose the Stars brush pack which is not a default set for Photoshop and so you probably will not have this one try Special Effect Brushes that’s a fun pack.


Step 5: When you select your chosen brush pack you will be faced with a dialog box that prompts: Replace current brushes with the brushes from [brushpackname], and the options ok, cancel, Append. This just confirms you want to apply the new brushes and it is very easy to switch back so feel safe to click ok.


Step 6: Thats It your new brushes are installed all you need to do is select a brush preset from the new set and your ready to begin youing them. (While most new brush packs meant for regular painting some are designed for one click patterns please check the brush with a single click first before painting with it to see which type it is both have a different effect, experiment and enjoy.)


Getting back to basics!

Getting back those basic brushes that we all know and love couldn’t be any easier. Using the same technique as to change brushes open your brush window, click the right pointing small arrow and select Basic Brushes. This will return your brush pack back to their default setting (note: you will have to select a brush from that back to activate the brushes otherwise your last selected brush will remain). See below Image E for how to change back to basic brush pack.