Basic Skills
This chapter covers fundamental solutions that we'll call upon throughout the remainder of this book. And as an added bonus, I'll show you how to create a coupon box with dotted borders -- no doubt you've always wanted to make your very own one of these!
Placing a Graphic in your File
Often you'll want to import existing graphics and artwork into your Photoshop document. A problem for Photoshop? Not at all -- in fact, there are several ways you can do this!
External graphics can be placed in Photoshop as raster layers or Smart Objects. First, I'll show you how to place these graphics, then we'll talk about the difference between raster layers and Smart Objects.
Solution
Placing Artwork from a Web Page
Copy the artwork from the web page, then select Edit > Paste or press Ctrl-V (Command-V on a Mac) to paste it into your Photoshop document. Photoshop will create a new layer containing the artwork, or place it into a selected empty layer. The artwork will be on a raster layer.
Placing Artwork from Flattened Image Files
A flattened image file -- such as a GIF, JPEG or PNG -- contains artwork on a single layer. Open the file in Photoshop and use Select > All or press Ctrl-A (Command-A) to create a selection of the entire document. Click on your Photoshop document then select Edit > Paste or press Ctrl-V (Command-V) to paste it. Photoshop will paste the document into a new or selected empty layer as it does when pasting artwork from a web page. The artwork will be on a raster layer.
Placing Layers from a Different Photoshop Document
Position the document windows so that both are visible. Select the window of the document you wish to import from, to bring up its Layers palette. Select and drag the necessary layers over to the new window and release the mouse button when you see a thick, black outline around the window. This will copy the layers across as shown in the example at the top of the next page. The copied layers will retain their original properties.
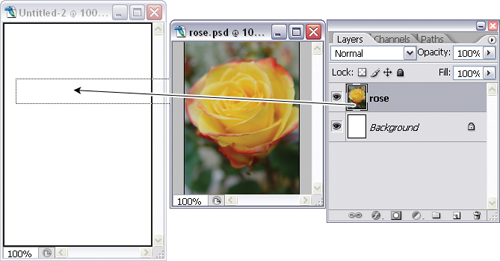
Copying a layer from one Photoshop document to another
Placing Artwork from Illustrator
Open Illustrator and select the artwork you wish to export to Photoshop. Copy the artwork using Ctrl-C (Command-C on a Mac). Switch to Photoshop while Illustrator is still open and paste your copied artwork using Ctrl-V (Command-V). A dialog box will appear, asking you whether you wish to paste the artwork as a Smart Object, Pixels, Path or a Shape Layer.
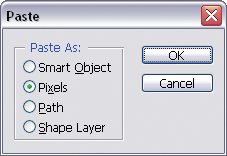
Paste dialog box
Placing Artwork as a Smart Object
Select File > Place and choose the file you wish to import. Click Place to import the file into your Photoshop document as a Smart Object. For PDF and Illustrator files, Photoshop will display a dialog box that asks you to select the pages you wish to place. Choose the pages you want and click OK.
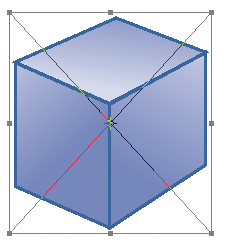
The bounding box for an image pasted as a Smart Object
The Smart Object will initially be placed with a bounding box surrounding it, as shown here. You can use this bounding box to move, rotate, scale, or make other transformations to the object. When you're done, double-click inside the bounding box to commit the Smart Object to its layer.
Discussion
Smart Objects
A Smart Object is an embedded file that appears in its own layer in Photoshop. A Smart Object layer is distinguished by an icon that overlays the thumbnail image displayed in the Layers palette, as shown in the example below.
Smart Objects are different from other layers because they are linked to a source file (e.g., an Illustrator file, JPEG, GIF or other Photoshop file). If you make changes to the source file, the Smart Object layer will also be updated with those changes.
![]()
Raster layer vs Smart Object layer
In contrast, raster layers (or regular layers) are fully editable, so you can draw and paint on them, fill them with colors, or erase pixels. Unlike Smart Objects, where you retain image quality, if you resize a raster layer smaller, you will lose information.
This is demonstrated in the example on the next page, which shows the result of a Smart Object that has been decreased in size, then resized back to its original dimensions. The same steps, when applied to a raster layer, produce an image that is blurred and of lower quality.
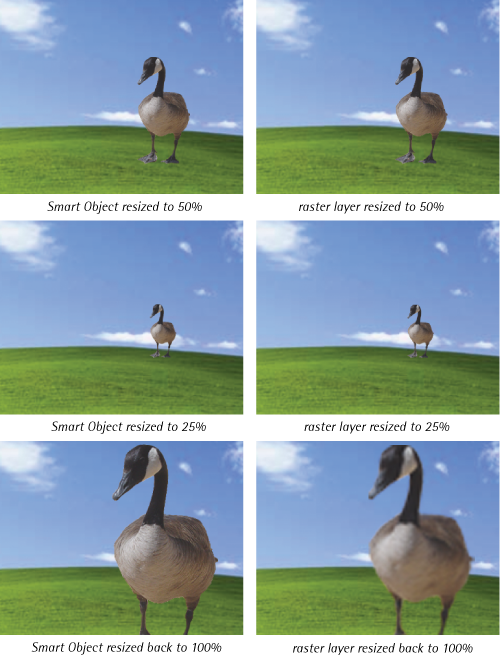
The difference in image quality when resizing a Smart Object compared to a raster layer
Because Smart Objects are linked to an outside document, you can resize them without losing the original image data. While you can apply layer effects and some transformations to Smart Object layers, you cannot actually manipulate (paint, draw, erase) their pixels because they are not editable from external documents. You can open the original source file for editing by double-clicking on the Smart Object icon.
Rasterizing
You can rasterize Smart Objects by right-clicking on the name of the Smart Object layer and choosing Rasterize Layer. This will break the link to the original source file and treat the layer as an ordinary raster layer.

No comments:
Post a Comment